What Do I Want To Make?
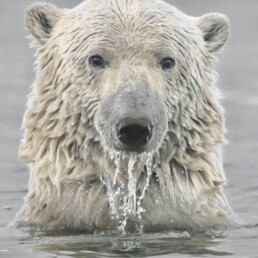
It all starts with inspiration. I have to feel something to really create. I travel with my family quite a bit (non covid times) and I take thousand of photos. Even when I’m not traveling I fill my camera phone with images that inspire me. Each one made me feel something. I use my iPad to view and manipulate the photos into the layout I want. Sometimes however, I’ll get an idea in my head and I don’t quite have the photo I want. This is when I look to pixy and other artist reference photo websites/Facebook groups for some help. Here is my photo on the right that inspired me to want a sunflower lying on a pumpkin. Pixaby had what I was looking for.
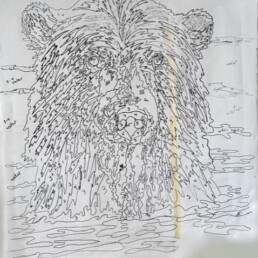
Basic Line Drawing
Next I begin to put the basic outline and layout on paper. I use a projector or
transfer paper to enlarge images and lay down the basic line drawing…that way I concentrate my efforts on the details. I enjoy working on the basic design layout making sure I have a good focal point and balance and hopefully have edited out the distracting elements before I begin with color. Once the line drawing and layout is exactly how I want it, I move on to the next step.
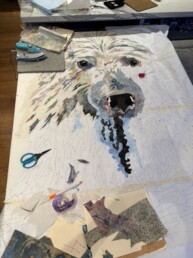
Choosing Colors and Materials
Color. If you haven’t noticed I LOVE color. The brighter. The better. I work primarily with batik materials because of their vibrant colors and unique designs. They coordinate well together and an added bonus is the color and pattern is seen on both sides, there is no “backside.” It also doesn’t fray much when cut into small pieces. I look for bright colors for the primary focal points of my quilts and coordinating shades and tones to add accents and value. This process is quite different from working in colored pencil or painting, but the idea of lighter and darker values is the same. This is what gives the picture depth. I layout the material I have choses in a general area over the line drawing before I start cutting.
Choosing Background and Foreground Fabric
Depending on the image I am creating, there will be varying amount of sky, foreground, background, water, land, etc. The background fabric needs to be just perfect as it needs to enhance the image and not overpower it. I try to stick with neutrals and let the bright colors of the images dominate. If the image is a close up and not a scene then I use plain muslin and glue the image pieces to it.
Attaching background/base Fabric to Board for Piecing
I attach the background or base material to a felt covered foam core board. This creates something rigid to layout my pieces and yet flexible enough I can just pin them to it as I am creating before I fasten all down permanently.
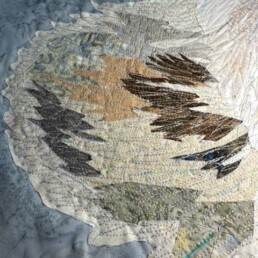
Cutting and piecing
I trace the pieces with interfacing on top of the line drawing and lay it over the material I have chosen and cut both out at the same time. I attach the pieces to the board with pins as I build the image by adding pieces and colors one at a time.
Attaching Pieces and adding border
Pieces are glued to the background using a regular school glue stick. It is easy to use and also not so permanent that I can’t move a piece around if I need to. I sew a coordinating two tp three inch border around the image.
Quilt Sandwich
The quilt top all glued together get layered over cotton batting and backing fabric and use spray adhesive for quilting to stabilize the “sandwich” for quilting.
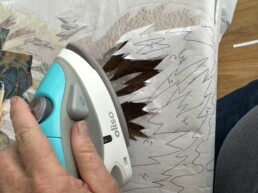
Free motion quilting/thread painting
I use free motion quilting technique to quilt the sandwich (sew all three layers
together)
Finishing the quilt
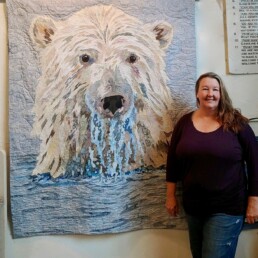
Finishing the quilt requires measuring each side and diameter to make sure the piece squares up evenly. Borders, binding, or facing (binding flipped to back side) are sewn all around the edge of the quilt. Most of my art quilts are wall hanging size 30″x40″ and not large enough to cover a bed. To complete the quilt I add a hanging sleeve on the top of the back side so a dowel can be inserted to hang the quilt on the wall.
Classes and workshops coming soon!
Contact me if you are interested in learning about colored pencils or quilting. I am teaching one on one or small groups if requested. I am not currently running any workshops.
CONTACT ME
Email Me: info@kjonesart.com
Call Me: (951) 252-4802